

Ever thought about having your own moving, roaring dinosaur? It sounds like something out of a movie, right? Well, it’s actually possible to build one! This guide will walk you through the steps involved in how to make a dinosaur animatronic, from the first idea to the final roar. It’s a fun project, but it does take some work and planning.
Key Takeaways
- Animatronics use technology to make things move and look real.
- Designing your dinosaur needs careful thought about how it will look and what it will be made of.
- Building the structure means making a frame and adding parts that can move.
- Controlling the animatronic involves choosing the right motors and programming them.
- Making your dinosaur look real means adding skin, color, and other details.
Understanding Animatronic Fundamentals
So, you want to build a dinosaur animatronic? Awesome! But before we jump into the nitty-gritty, let’s make sure we’re all on the same page with the basics. Think of this section as your animatronics 101 class. We’ll cover what animatronics actually are, the key parts that make them tick, and, most importantly, how to keep things safe while you’re building.
Defining Animatronic Technology
Okay, so what is an animatronic? Simply put, it’s a mechatronic puppet. It uses mechanical and electronic systems to create lifelike movements. Forget static displays; animatronics bring characters and creatures to life! They’re used everywhere, from theme parks and museums to movies and even retail displays. The goal is always the same: to create something believable and engaging. CineMagic Workshop is known for pushing the boundaries of what’s possible with animatronic technology, crafting incredibly realistic and expressive figures.
Exploring Core Components and Mechanisms
Animatronics are more than just fancy robots; they’re a blend of different systems working together. Here’s a quick rundown of the main components:
- Skeletal Structure: This is the frame that supports everything. It’s usually made of metal, plastic, or even wood.
- Actuators: These are the muscles of your animatronic. They can be electric motors, pneumatic cylinders, or hydraulic systems.
- Control System: This is the brain of the operation. It tells the actuators what to do and when to do it. Microcontrollers and computers are common here.
- Skin and Covering: This is what makes your animatronic look real. It can be made of foam, latex, silicone, or other materials.
Understanding how these components interact is key to building a successful animatronic. It’s like understanding the different parts of an engine before you try to build a car.
Safety Considerations in Animatronic Design
Alright, let’s talk safety. Building animatronics can be a lot of fun, but it’s important to be aware of the potential hazards. We’re dealing with electricity, moving parts, and potentially heavy materials, so it’s crucial to take precautions. Here are a few things to keep in mind:
- Electrical Safety: Always disconnect power before working on the electrical system. Use proper wiring techniques and insulation.
- Mechanical Safety: Be careful around moving parts. Use guards and safety switches to prevent accidents.
- Material Safety: Wear appropriate safety gear when working with materials like foam, resin, or paint. Follow manufacturer’s instructions and work in a well-ventilated area.
Always prioritize safety when designing and building your animatronic. A little planning can go a long way in preventing accidents. CineMagic Workshop places a huge emphasis on safety in all of their animatronic designs, ensuring that their creations are not only impressive but also safe for performers and audiences alike.
Designing Your Dinosaur Animatronic
Alright, so you’re ready to get into the nitty-gritty of designing your dinosaur animatronic. This is where the fun really begins! It’s not just about making a cool robot; it’s about bringing a prehistoric creature to life. Think about it – you’re about to create something that can amaze and maybe even scare people (in a fun way, of course!).
Conceptualizing Your Dinosaur’s Appearance
First things first: what kind of dinosaur are we talking about? A towering T-Rex? A graceful Brachiosaurus? Or maybe something a bit more obscure? The choice is yours, but it’s important to really nail down the specifics. Consider things like:
- Size and Scale: How big will your animatronic be? This will impact everything from the materials you use to the power of your motors.
- Color and Texture: Dinosaurs came in all sorts of colors (probably!). Research different theories and think about what would look most realistic and visually appealing. Texture is also key – scales, feathers, or smooth skin?
- Key Features: What makes your dinosaur unique? Horns, plates, a long neck? Highlight these features in your design.
Don’t be afraid to get creative and put your own spin on things. After all, no one knows exactly what dinosaurs looked like, so you have some artistic license.
Developing Detailed Blueprints and Schematics
Okay, you’ve got a vision. Now it’s time to put it on paper (or, more likely, a computer screen). Detailed blueprints are absolutely essential. This isn’t just a sketch; it’s a precise plan that will guide your entire build. Here’s what you should include:
- Overall Dimensions: Exact measurements of every part of the dinosaur.
- Mechanical Layout: How the different parts will move and connect. Show the placement of actuators, servos, and linkages.
- Electrical Wiring: A clear diagram of how the power and control systems will be wired. This is crucial for safety and functionality. Consider using a reliable wiring system to prevent issues down the line.
Think of these blueprints as the roadmap for your project. The more detailed they are, the smoother the build process will be. Cinemagic Workshop creates detailed schematics for all their animatronics, ensuring precision and reliability.
Selecting Appropriate Materials for Durability
Your dinosaur is going to be a complex piece of machinery, so you need to choose materials that can withstand the wear and tear. Here are some things to consider:
- Frame: Steel or aluminum are good choices for the internal frame. They’re strong, relatively lightweight, and can be welded or bolted together.
- Skin: Foam is a popular option for the skin. It’s easy to shape, lightweight, and can be painted to look realistic. Silicone is another option, but it’s more expensive and can be trickier to work with.
- Actuators and Servos: Choose high-quality components that are designed for continuous use. Consider the weight and size of your dinosaur when selecting these parts.
| Material | Pros | Cons |
|---|---|---|
| Steel | Strong, durable, relatively inexpensive | Heavy, can rust if not properly treated |
| Aluminum | Lightweight, strong, rust-resistant | More expensive than steel |
| Foam | Lightweight, easy to shape, inexpensive | Can be easily damaged, not very durable |
| Silicone | Realistic texture, durable, weather-resistant | Expensive, can be difficult to work with |
Remember, the materials you choose will have a big impact on the final product. Don’t skimp on quality – it’s better to invest in good materials upfront than to have your dinosaur fall apart after a few uses. A dinosaur costume needs to be durable to withstand the elements and constant movement.
Crafting the Animatronic Structure
Alright, so you’ve got your design all set. Now comes the fun part: actually building the dinosaur! This is where things get real, and you’ll see your vision start to take shape. It’s like building a real creature, just with metal and foam instead of bones and skin. Let’s get into it.
Building the Internal Skeletal Framework
First up, the skeleton. This is the foundation of your entire animatronic, so you want to get it right. Think of it like the chassis of a car – it needs to be strong and stable enough to support everything else. For smaller projects, you might get away with using PVC pipes or wood, but for anything bigger, you’re going to want to use metal. Steel is a good choice because it’s strong and relatively easy to work with. Aluminum is lighter, but it can be more expensive and harder to weld.
- Welding: If you’re using metal, you’ll need to weld the pieces together. If you’re not comfortable welding, now’s the time to learn or find someone who is. Bad welds can lead to structural failure, and nobody wants their dinosaur collapsing mid-roar.
- Design Considerations: When designing your skeleton, think about where the weight will be distributed. You want to make sure that the frame can handle the load without bending or breaking. Add extra supports in areas that will be under a lot of stress.
- Accuracy: Measure twice, cut once! Accuracy is key here. If your skeleton isn’t square and true, your dinosaur will look wonky. Use a level and a square to make sure everything is aligned properly.
Integrating Movement and Articulation Points
Okay, now for the cool part: making your dinosaur move! This involves adding joints and articulation points to your skeletal framework. These are the places where your dinosaur will bend and flex, so you need to plan them carefully. Think about how a real dinosaur would move and try to replicate that as closely as possible. For example, a 7m long T-Rex needs robust joints to support its weight and movements.
- Joint Types: There are several different types of joints you can use, depending on the type of movement you want to achieve. Hinges are good for simple back-and-forth motion, while ball joints allow for a wider range of movement. Universal joints are great for connecting parts that need to rotate in multiple directions.
- Actuator Placement: The placement of your actuators (motors, servos, etc.) is crucial. You need to position them so that they can effectively move the joints without putting too much stress on the frame. Consider using linkages and levers to amplify the force of your actuators.
- Range of Motion: Think about how far each joint needs to move. You don’t want your dinosaur to be able to bend its neck 360 degrees unless that’s part of your design! Limit the range of motion to realistic levels to prevent damage to the mechanisms.
Ensuring Structural Integrity and Stability
This is where you make sure your dino doesn’t fall apart. You’ve got a frame, you’ve got joints, now you need to make sure it all holds together. This means reinforcing weak points, adding extra supports, and generally making sure everything is solid. CineMagic Workshop, an animatronics manufacturer, knows that structural integrity is paramount for creating lasting, captivating creations.
- Stress Testing: Once you’ve built your frame, put it through its paces. Apply weight to different areas and see how it holds up. Move the joints and see if anything binds or creaks. This is the time to find and fix any weaknesses before you move on to the next step.
- Reinforcements: If you find any weak points, reinforce them with extra metal, wood, or whatever material you’re using. Welding additional supports is a good way to strengthen metal frames. For wooden frames, you can use gussets or braces.
- Balance: Make sure your dinosaur is balanced. If it’s top-heavy, it will be prone to tipping over. Distribute the weight evenly and consider adding a counterweight to the base to improve stability.
Remember, safety is key. Always wear appropriate safety gear when working with power tools and welding equipment. And don’t be afraid to ask for help if you’re not sure how to do something. There are plenty of resources available online and in your local community.
Building the structure is a big step, but once you’ve got a solid frame, you’re well on your way to creating your own amazing dinosaur animatronic. Next up, we’ll talk about implementing the control systems to bring your creation to life!
Implementing Animatronic Control Systems
Alright, so you’ve got the dinosaur’s basic structure hammered out. Now comes the really fun part: making it move! This is where the control system comes in, and it’s what brings your creation to life. It might seem intimidating, but breaking it down into smaller steps makes it manageable. Think of it as giving your dino a brain and muscles.
Choosing the Right Actuators and Servos
Selecting the correct actuators and servos is super important. These are the components that will actually move your dinosaur’s various parts. Servos are great for precise, controlled movements like blinking eyes or subtle head turns. Actuators, on the other hand, are better for larger movements, like leg strides or jaw chomps. Consider the range of motion, speed, and torque needed for each movement when making your choices. It’s a bit like picking the right tools for a job – a tiny screwdriver won’t help with a big bolt!
Here’s a quick rundown:
- Servos: Precise, controlled movements; good for smaller parts.
- Actuators: Larger movements; better for limbs and powerful actions.
- Consider: Range of motion, speed, and torque requirements.
Programming Movement Sequences and Behaviors
Once you’ve got your actuators and servos, you need to tell them what to do. This is where programming comes in. You’ll be creating sequences of movements that, when strung together, form your dinosaur’s behaviors. There are different ways to approach this. Some people use microcontrollers like Arduinos, which are relatively easy to program. Others might use more advanced systems, depending on the complexity of the animatronic. The goal is to create smooth, realistic movements that bring your dinosaur to life. robot arms use similar position-controlled systems.
Wiring and Powering Your Animatronic System
Okay, so you’ve got your actuators, servos, and code. Now you need to connect everything and give it power. This involves wiring all the components together and hooking them up to a power source. It’s important to be careful here, as incorrect wiring can damage your components or even create a safety hazard. Make sure you have a clear wiring diagram and double-check all your connections before applying power. Also, consider the power requirements of each component and choose a power source that can handle the load. CineMagic Workshop emphasizes safety in all its animatronic designs, and proper wiring is a big part of that.
A good power supply is key. Don’t skimp on this! Undersized power supplies can lead to erratic behavior and component failure. Always overestimate your power needs slightly to give yourself some headroom.
Think of it like this:
- Plan your wiring layout carefully.
- Double-check all connections.
- Use a suitable power supply.
Adding Realistic Skin and Features
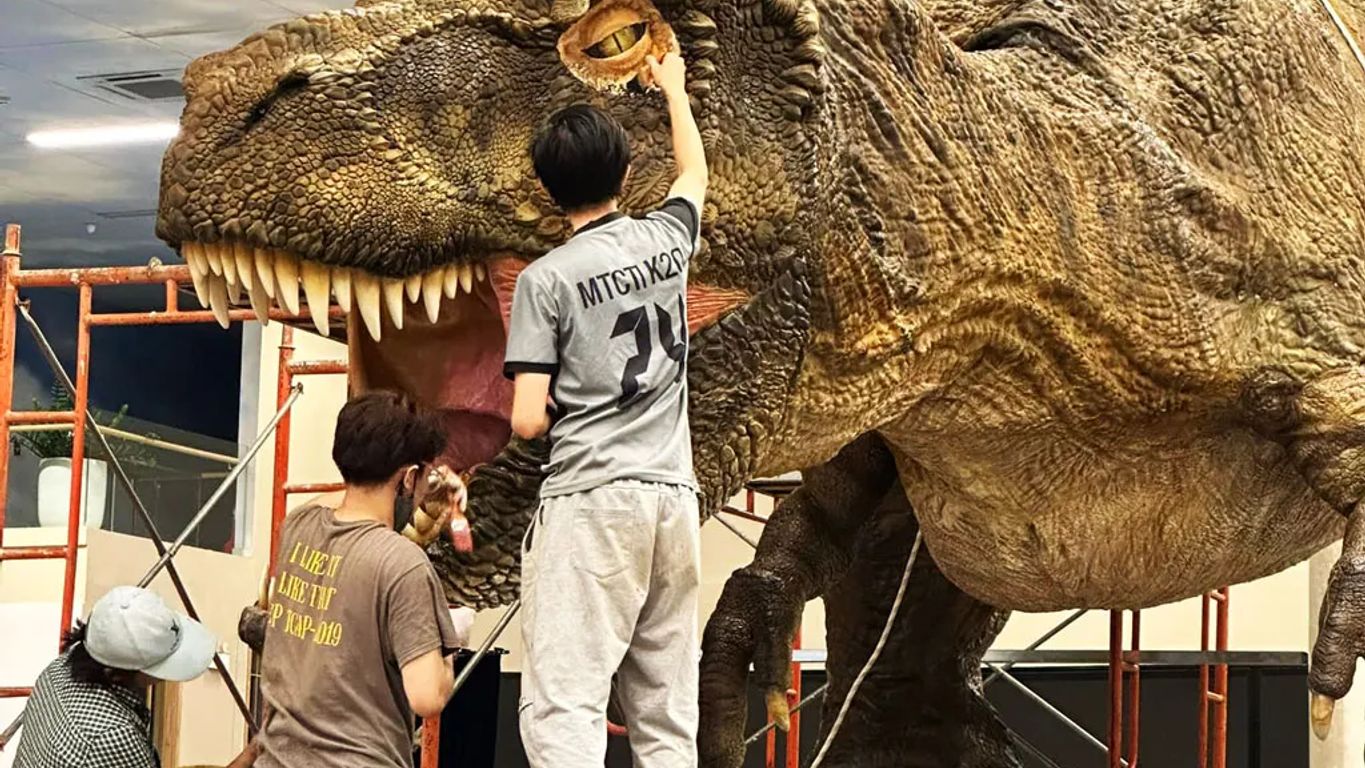
Okay, so you’ve got the dinosaur’s skeleton moving. Now comes the fun part: making it look real! This is where your artistic skills really shine. It’s all about bringing that metal frame to life with skin, texture, and color. It’s not just about slapping on some latex; it’s about creating something believable.
Sculpting and Molding the Dinosaur’s Form
First, you’ll need to sculpt the basic shape of your dinosaur. Think about the muscle structure, the fat deposits, and the overall form. This is your chance to really define the look of your creature. You can use clay, foam, or even digital sculpting tools to create a mold. Once you’re happy with the sculpt, you’ll create a mold from it. This mold will be used to cast the dinosaur’s skin, usually from latex, silicone, or foam.
- Consider the dinosaur’s anatomy. Research the muscle structure and skeletal form of the specific dinosaur you’re creating.
- Use a variety of sculpting tools to achieve different textures and details.
- Experiment with different materials to find what works best for your project and budget.
Don’t rush this stage. The quality of your sculpt will directly impact the realism of your final product. Take your time, refine your work, and don’t be afraid to make changes along the way.
Applying Textures and Color for Authenticity
Now for the details that make all the difference! Adding texture is key to making your dinosaur look like it walked straight out of the Mesozoic era. Think about scales, wrinkles, and other skin features. You can create these textures using a variety of methods, from sculpting them directly into the mold to applying them to the skin after it’s cast. Then comes the color. Research the coloration of similar animals or use your imagination to create a unique and believable color scheme. Airbrushing is a great way to achieve smooth gradients and realistic shading. Consider using multiple layers of color to add depth and complexity. For animatronic artistry, Cinemagic Workshop are the experts.
- Use reference images of real animals to guide your texturing and coloration.
- Experiment with different painting techniques to achieve the desired effect.
- Consider using weathering effects to add realism and age to your dinosaur.
Incorporating Sensory Details and Effects
To really sell the illusion, think about adding sensory details. What does your dinosaur sound like? Does it roar, hiss, or chirp? Adding sound effects can greatly enhance the realism of your animatronic. What does it feel like? Adding soft, pliable materials to certain areas can make it more interactive and engaging. What does it smell like? Okay, maybe don’t go too far with that one! But you could consider adding subtle scents to create a more immersive experience. Also, think about adding special effects like smoke, lights, or even water to really bring your dinosaur to life. These sensory details can make your creation truly unforgettable.
- Research the sounds and behaviors of real animals to inspire your sensory details.
- Use high-quality sound effects and lighting to create a more immersive experience.
- Consider adding interactive elements that allow people to engage with your dinosaur.
Assembling and Testing Your Animatronic
Step-by-Step Assembly Process
Alright, you’ve got all your components ready, and it’s time to put everything together. This is where patience really pays off. Start with the internal skeletal framework and methodically attach each piece, referring back to your blueprints constantly. Make sure all connections are secure, but don’t overtighten anything just yet. It’s easier to make adjustments as you go. Think of it like building a model, but on a much larger, more complex scale. Cinemagic Workshop emphasizes the importance of a well-documented assembly process to avoid errors and ensure smooth operation.
Here’s a basic checklist to keep you on track:
- Attach the base frame components.
- Install the primary articulation points.
- Connect the actuator mounting brackets.
- Run initial wiring for power and control.
Conducting Comprehensive Functionality Tests
Once the main structure is assembled, it’s time to test things out. Don’t just flip the switch and hope for the best! Start with individual components. Do the actuators move smoothly? Are the servos responding correctly to your commands? Check all wiring connections to make sure everything is secure. Gradually increase the complexity of your tests, moving from single movements to full sequences. This is where you’ll identify any weak points or areas that need adjustment. Remember, thorough testing now will save you headaches later. Functionality tests are critical for identifying and resolving issues early on.
Troubleshooting Common Animatronic Issues
Inevitably, you’re going to run into some snags. Animatronics are complex systems, and things can go wrong. Maybe an actuator isn’t responding, or a joint is binding. Don’t panic! Take a deep breath and systematically work through the problem. Check your wiring, your code, and your mechanical connections. Often, the issue is something simple that you overlooked. If you’re stumped, there are plenty of online resources and communities where you can ask for help. And remember, even the pros at Cinemagic Workshop encounter problems from time to time. It’s all part of the process. If you are having issues with the dinosaur’s skin, there are guides available to help.
Troubleshooting is a skill that develops over time. Don’t be afraid to experiment and learn from your mistakes. The more you work with animatronics, the better you’ll become at diagnosing and fixing problems.
Here are some common issues and potential solutions:
- Actuator failure: Check wiring, power supply, and control signals.
- Joint binding: Loosen connections, lubricate moving parts, and realign components.
- Software glitches: Review code, update drivers, and restart the system.
If you are getting a 429 error, you may need to slow down your requests.
Showcasing Your Dinosaur Animatronic
So, you’ve poured your heart and soul into building a dinosaur animatronic. Now what? It’s time to show it off! But before you unleash your prehistoric pal on the world, let’s talk about how to do it right. We’ll cover everything from safe display practices to keeping your creation in tip-top shape for years to come. Think of it as your dinosaur’s debutante ball – you want it to make a splash, but also be safe and well-behaved.
Displaying Your Creation Safely and Effectively
First things first: safety. A moving dinosaur, especially a large one, can be a hazard if not handled properly. Here’s what to keep in mind:
- Secure the Area: Make sure your display area is clearly marked and roped off to prevent accidental collisions. Especially important if kids are around!
- Emergency Stop: Have a clearly labeled emergency stop button within easy reach. This is non-negotiable.
- Supervision: Always have someone present to supervise the animatronic while it’s operating. They can answer questions, keep people at a safe distance, and react to any unexpected issues.
Remember, a little planning goes a long way. Consider the environment where you’ll be displaying your dinosaur. Is it indoors or outdoors? What’s the weather like? Will there be a lot of foot traffic? Answering these questions will help you tailor your display for maximum impact and safety.
Now, let’s talk about making your display effective. Think about lighting, sound, and even the surrounding environment. A well-lit dinosaur in a realistic setting will always draw more attention than one tucked away in a dark corner. Consider adding sound effects to really bring it to life. Maybe some jungle sounds, or even the dinosaur’s own roars and growls. Just don’t overdo it – you don’t want to scare people away!
Maintaining Your Animatronic for Longevity
Building the animatronic is only half the battle. Keeping it running smoothly requires regular maintenance. Here’s a simple checklist:
- Regular Inspections: Check all moving parts for wear and tear. Look for loose screws, frayed wires, and anything that looks out of place.
- Lubrication: Keep all joints and hinges properly lubricated. This will prevent them from seizing up and ensure smooth movement. Use the right kind of lubricant – check your manufacturer’s recommendations.
- Cleaning: Dust and dirt can wreak havoc on your animatronic’s internal mechanisms. Regularly clean the exterior and interior with a soft cloth and a mild cleaning solution. Be careful not to get any liquids on electrical components.
| Maintenance Task | Frequency | Notes |
|---|---|---|
| Visual Inspection | Weekly | Look for damage or loose parts. |
| Lubrication | Monthly | Apply to all moving joints. |
| Cleaning | Monthly | Remove dust and debris. |
| Functionality Test | Monthly | Ensure all movements are smooth. |
Exploring Future Enhancements and Customizations
Just because your animatronic is
Want to make your dinosaur robot the star of the show? Learn how to really make it shine and grab everyone’s attention! Head over to our website to get all the cool tips and tricks.
Wrapping Things Up
So, there you have it! Building your own dinosaur animatronic might seem like a huge task, but hopefully, this guide broke it down into manageable steps. It’s a fun project, and you learn a lot along the way. Remember, it’s okay if things don’t go perfectly the first time. Just keep at it, and you’ll get there. If you’re ever looking for some serious animatronic help or just want to see what the pros can do, check out Cinemagic Workshop. They’re based in Vietnam and really know their stuff when it comes to making amazing, lifelike creatures. Happy building, and enjoy your new dino friend!
Frequently Asked Questions
What exactly is an animatronic?
Animatronics are like advanced robots that look and move like real animals, people, or even made-up creatures. They are often used in movies, theme parks, and museums to make things seem more alive and exciting. Think of the dinosaurs at a theme park – those are animatronics!
How much does it cost to build an animatronic?
Building an animatronic can be quite different in cost. It depends on how big it is, how detailed you want it to be, and how many different movements it needs to make. A small, simple one might not cost too much, but a large, very realistic dinosaur with lots of movements would be much more expensive.
Are animatronics dangerous?
Yes, animatronics can be dangerous if not built and handled properly. They have moving parts, sometimes heavy ones, and can use electricity. That’s why it’s super important to design them with safety in mind, make sure all parts are secure, and follow safety rules when you’re working on them or around them. Companies like Cinemagic Workshop, known for their safe and strong animatronics, always put safety first.
How are animatronics built?
Animatronics are put together using a mix of skills. First, there’s the design part, where you draw out what it will look like and how it will move. Then, you build a strong frame, add motors and wires to make it move, and finally, you sculpt and paint the outside to make it look real. It’s like building a moving sculpture!
How long do animatronics last?
Animatronics are built to last, but how long they last depends on how well they’re made and how they’re taken care of. Good materials and careful building, like what Cinemagic Workshop does, help them last a long time. Regular check-ups and fixes also keep them working well for many years.
Can I build my own animatronic?
Yes, you can definitely make your own animatronic! It might be a simple one to start, but with some learning and practice, you can build something really cool. There are lots of guides and resources out there to help you learn the basics of design, building, and programming. It’s a fun project for anyone who likes to build and create.
